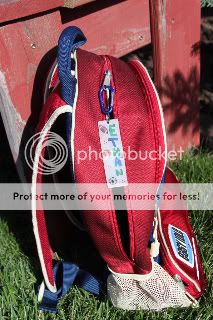
Personalize your child's backpack by adding this Shrinky Dink Backpack Tag made by them!
What you need:
Shrinky Dink Rough and Ready (We got ours at Michael's Crafts)
Scissors
Hole Punch
Colored Pencils
Minni Clip Key Chain (We got ours at Oriental Trading)
Oven or Toaster Oven
Cookie Sheet
Brown Paper Sack

How To:
Step 1: Cut a 2.5" by 8" rectangle out of a Rough and Ready Shrinky Dink Sheet.Use the scissors to round off the corners of your rectangle, otherwise they end up sharp after shrinking.
Step 2: Use the hole punch to punch a hole in the center of one end of your rectangle.

Step 3: Decorate the rough side of your rectangle using the colored pencils,You may want to reverse any lettering. Some ideas of things to draw are balls, stars, flowers, dots, or spirals. Let your kids be creative.
Step 4: Bake your projects according to the Shrinky Dink package diretions. Watch your rectangles shrink right before your eyes in a matter of minutes.
Step 5:Attach the key ring of the mini clip through the hole in the now shrunk rectangle, and attach to the zipper of your backpack or lunchbox.

Extra Hints and Tips:
*Sometimes projects can curl and stick when shrinking. Some people lightly dust their projects with baby powder to help prevent the sticking.
*In my opinion, toaster ovens work the best because they have more even heating and no hot spots like bigger ovens.
*Be careful not to punch your hole too close to the edge of your project. I had one nametag ring pull out because the distance between the hole and edge was too narrow.
*When decorating, if you take a dry erase marker and write your name on the shiny side of the Shrinky Dink you can eaisly see though your Shrinky Dink plastic so that you can reverse your letters without trouble. Then just wipe off your marker lines.
*Ideas of things to draw.. balls, dots, spirals, squiggles, flowers, butterflies, or stars.
*To see more fun ideas with what you can do with this project check out WhiMSy love

Shrinky Dink Backpack Tag Craft Kit Give Away!!!
Hello all you Hoodies out there checking in from The HOOD Magazine!
To celebrate the first issue, I would like to give away a craft kit to make this project.
The winner (who will be chosen at random) will receive...
*One package of Shrinky Dink
*Three mini key chain clips
How to enter:
You must do Two things to enter.
1. Follow Kara's Creative Place by clicking the follow button on this page!
2. Leave a comment below this post about what you liked about The Hood Magazine.Please include your email in the post so I can contact you if you are the winner!
Only one comment per person please!
Winner will be announced September 1st!

No comments:
Post a Comment